Grant J Butler

Articles

May 2026

Dynamic Colors in SwiftUI

4 min
#swiftui #tips-and-tricks

If you've been working in SwiftUI long enough, then you've probably wanted the ability to create a color at runtime that varies depending on if the user has their device in dark mode or light mode. Maybe you're consuming content from an API that provides colors for both modes, or maybe you're taking one color to use for one mode and transforming it in some way to get another color to use for the other mode. Regardless of why you're doing it, you're in a situation where using an asset catalog or some other mechanism for defining your colors up front doesn't work for you.

Fortunately, UIKit and AppKit both have your back in this situation. Both UI frameworks have API on their respective color types that allow you to inspect the environment the color is used in, detect whether light or dark mode is being used, and resolve a color to use at runtime. Surprisingly, though, no equivalent initializer exists in SwiftUI. However, because we can go from a SwiftUI Color to a UIKit UIColor or AppKit NSColor and back again, we can leverage the other UI frameworks to dynamically resolve a color and then give that resolved color to SwiftUI to use. Maybe you've written an extension that does this, something along these lines:

extension Color {
    static func dynamic(light: Color, dark: Color) -> Color {
        Color(UIColor(dynamicProvider: { traitCollection in
            traitCollection.userInterfaceStyle == .dark ? UIColor(dark) : UIColor(light)
        }))
    }
}

This works. There's nothing really wrong with it. This is part of the point of the SwiftUI API, to give us these escape hatches when we need to use them because the SwiftUI API surface has some gap. Fortunately, this gap was addressed in iOS 17 and macOS 14. Starting with these OS versions, SwiftUI added new requirements to the ShapeStyle protocol (which Color, among other things, conforms to):

@available(iOS 13.0, macOS 10.15, tvOS 13.0, watchOS 6.0, *)
public protocol ShapeStyle : Sendable {

    /// The type of shape style this will resolve to.
    ///
    /// When you create a custom shape style, Swift infers this type
    /// from your implementation of the required `resolve` function.
    @available(iOS 17.0, macOS 14.0, tvOS 17.0, watchOS 10.0, *)
    associatedtype Resolved : ShapeStyle = Never

    /// Evaluate to a resolved shape style given the current `environment`.
    @available(iOS 17.0, macOS 14.0, tvOS 17.0, watchOS 10.0, *)
    func resolve(in environment: EnvironmentValues) -> Self.Resolved
}

While ShapeStyle previously was a public protocol that we could conform our own type to, there weren't any requirements. That is, there weren't any hooks that SwiftUI could call on our type to do something with it. So, prior to iOS 17 and macOS 14, it didn't really make much sense to create a custom type that conformed to ShapeStyle.

But with these new requirements, now there are hooks that we can implement that SwiftUI can call into and do something with our custom shape style. These requirements look similar to UIColor's and NSColor's initializers: we're given some input we can query and then return a color depending on that input. Since we receive a SwiftUI environment when our resolve method is called, we can query its color scheme to determine if we're in light mode or dark mode, and return an appropriate color.

struct DynamicColor: ShapeStyle {
    let light: Color
    let dark: Color
    
    func resolve(in environment: EnvironmentValues) -> Color {
        return environment.colorScheme == .dark ? dark : light
    }
}

extension ShapeStyle where Self == DynamicColor {
    static func dynamic(light: Color, dark: Color) -> DynamicColor {
        DynamicColor(light: light, dark: dark)
    }
}

With this custom shape style in place, we can dynamically resolve colors at runtime without needing to fallback to other UI frameworks and it works in all the places where Color or any other ShapeStyle-conforming type would work. While a bit contrived, the following code sample showcases how we can use DynamicColor to change the background color of a view hierarchy depending on if the user is using light or dark mode:

struct ContentView: View {
    var body: some View {
        VStack {
            Image(systemName: "globe")
                .imageScale(.large)
                .foregroundStyle(.tint)
            Text("Hello, world!")
        }
        .padding()
        .background(.dynamic(light: Color.orange, dark: Color.pink))
    }
}


The text 'Hello, world!' with a globe icon stacked above it. Both are layered on top of an orange background, as this is a screenshot from an app running in light mode, and the dynamic color resolves to orange in light mode. The text 'Hello, world!' with a globe icon stacked above it. Both are layered on top of an pink background, as this is a screenshot from an app running in dark mode, and the dynamic color resolves to pink in dark mode.

In the situation that we do need to use a Color some place, we can leverage this initializer on Color:

@frozen public struct Color : Hashable, CustomStringConvertible, Sendable {

    /// Creates a color that represents the specified custom color.
    @available(iOS 17.0, macOS 14.0, tvOS 17.0, watchOS 10.0, *)
    public init<T>(_ color: T) where T : Hashable, T : ShapeStyle, T.Resolved == Color.Resolved

}

With a few tweaks to DynamicColor to make it Hashable and to return Color.Resolved instead of Color, we can pass an instance to this initializer to create a Color from it:

struct DynamicColor: ShapeStyle, Hashable {
    let light: Color
    let dark: Color
   
    func resolve(in environment: EnvironmentValues) -> Color.Resolved {
        return environment.colorScheme == .dark
            ? dark.resolve(in: environment)
            : light.resolve(in: environment)
    }
}

extension Color {
    static func dynamic(light: Color, dark: Color) -> Color {
        .init(DynamicColor(light: light, dark: dark))
    }
}

And with that, everything is in place to let us vary a color depending on whether the user is using light or dark mode in a cross-platform way that doesn't rely on falling back to other UI frameworks.
September 2023

Making Tailwind and Publish Play Nice With Each Other

8 min
#blogging #tailwind #publish

I won't lie. I'm not a designer. I may have an intiution about whether something is designed well or not by looking at it, but if you asked me to make something from scratch, while I may be able to make something usable, it's certainly not going to be the best designed thing you've ever seen.

When it comes to web development, one of the first things I pull into a new project is Tailwind. It's a utility-first CSS framework with some solid defaults that makes it easy to build something that looks good, while not boxing you in to something that looks generic. For someone like me, it's a great tool for helping me build something that looks decent.

Most of the time, Tailwind gets integrated with other build tools, like webpack or vite, where the generation of your site's styles are just one piece of a larger build process, which may copy images around, compile Vue or React components into straight JavaScript, and more. For this site, though, we're using Publish as our static site generator, which doesn't leverage any of these build tools already as part of its site generation process. While we could pull one of them it, it'd be overkill since we wouldn't be using any of their other features.

Fortunately, in addition to the above integrations with existing frontend built tools, you can run Tailwind directly with a command line tool to generate styles from your source code. With just a little bit of work, we can wrap up calling out to their CLI tool into a PublishingStep to integrate Tailwind into the build pipeline for our Publish site.

Installing Tailwind

Before we start writing any of the Swift code of our PublishingStep, we need to make sure that Tailwind is installed and properly configured. We can follow the installations docs for their CLI tool, using the root directory of our Swift package as the location of our NPM package. Since we're following the structure of a Swift package for our code, and the structure of a Publish site for our content, we'll need to update our tailwind.config.js file to tell it where to look for styles.

/** @type {import('tailwindcss').Config} */
module.exports = {
  content: [
    "./Sources/**/*.swift",
    "./Content/**/*.{md,html,js}"
  ],
  theme: {
    extend: {},
  },
  plugins: [],
}

The two places that we tell Tailwind to look for styles are our Swift files (so it can detect which styles we may be using in our site's theme), and our content files (so it can detect any styles in any of the Markdown, HTML, or JavaScript files we may write). This is what works for me for my site, so if you have other files that have Tailwind styles, make sure you add the paths to the config file.

With Tailwind's configuration updated, we can start working on writing the PublishingStep that'll invoke Tailwind.

Building the PublishingStep

First things first, we need to import a few different targets. We need the Publish target, so we can get access to the API we need for creating this PublishingStep. We'll pull in the ShellOut target, to give us a streamlined interface to invoking command line executables, like the Tailwind CLI tool. Finally, we'll pull in the Files target to give us a set of convenience APIs for interacting with the filesystem.

With the targets imported, we can create the factory method for our PublishingStep that will invoke Tailwind:

import Files
import Publish
import ShellOut

extension PublishingStep {
    static func generateTailwindCSS(
        inputPath: Path = "Resources/styles.css",
        outputPath: Path = "styles.css"
    ) -> PublishingStep {
        .step(named: "Generate Tailwind CSS", body: { context in
            
        })
    }
}

This step takes in two arguments: the source CSS file that has the Tailwind directives in it, and an output file where the generated CSS should be put within Publish's Output folder.

Now we can start to fill in the body of our step to actually invoke Tailwind:

import Files
import Publish
import ShellOut

extension PublishingStep {
    static func generateTailwindCSS(
        inputPath: Path = "Resources/styles.css",
        outputPath: Path = "styles.css"
    ) -> PublishingStep {
        .step(named: "Generate Tailwind CSS", body: { context in
            try shellOut(
                to: "npx",
                arguments: ["tailwindcss", "-i", context.file(at: inputPath).path, "-o", context.outputFile(at: outputPath).path, "--minify"]
            )
        })
    }
}

Using the shellOut function provided by the ShellOut package, we run the tailwindcss command by way of npx, providing our source CSS file as the input path and the location where the generated CSS should live as the output path. We also tell Tailwind to minify the CSS, to reduce the size of the generated file. However, if we include this step in our build pipeline and try to run it, we'll run into a few issues.

First, outputFile(at:) actually expects the file at the given path to exist. Even if all we're wanting to do is determine the path to a file in Publish's Output directory so we can give it to Tailwind, the method will still check to see if the file exists and throw an error if it doesn't. We can work around this by creating the file ourselves before invoking Tailwind by utilizing the createOutputFile(at:) method on the publishing context. Like outputFile(at:), this method returns a File type, which we can use to get a path to pass on to Tailwind:

import Files
import Publish
import ShellOut

extension PublishingStep {
    static func generateTailwindCSS(
        inputPath: Path = "Resources/styles.css",
        outputPath: Path = "styles.css"
    ) -> PublishingStep {
        .step(named: "Generate Tailwind CSS", body: { context in
            try shellOut(
                to: "npx",
                arguments: ["tailwindcss", "-i", context.file(at: inputPath).path, "-o", context.createOutputFile(at: outputPath).path, "--minify"]
            )
        })
    }
}

The next error we'll run in to depends on if we're running our build pipeline from within Xcode. If you're running in Xcode, you'll likely see an error in the console stating that npx cannot be found. Because we're using Publish to generate our site, we end up running a command line executable to perform that work. That executable inherits the environment of where it's running, which includes any modifications you may have made to your $PATH environment variable to locate various executables. Those modifications may not be inherited by Xcode, so when you run from within Xcode, it's likely that npx won't be found and the style generation step will fail.

To fix this for when we generate our site from within Xcode, we can see if a path to npx has been provided as an environment variable and use that, falling back to just calling npx and letting it be resolved based off of the $PATH in the current environment. Since we'll be using the ProcessInfo type for inspecting the environment, we'll also need to import Foundation to get access to that API:

import Files
import Foundation
import Publish
import ShellOut

extension PublishingStep {
    static func generateTailwindCSS(
        inputPath: Path = "Resources/styles.css",
        outputPath: Path = "styles.css"
    ) -> PublishingStep {
        .step(named: "Generate Tailwind CSS", body: { context in
            try shellOut(
                to: ProcessInfo.processInfo.environment["NPX_BINARY", default: "npx"],
                arguments: ["tailwindcss", "-i", context.file(at: inputPath).path, "-o", context.createOutputFile(at: outputPath).path, "--minify"]
            )
        })
    }
}

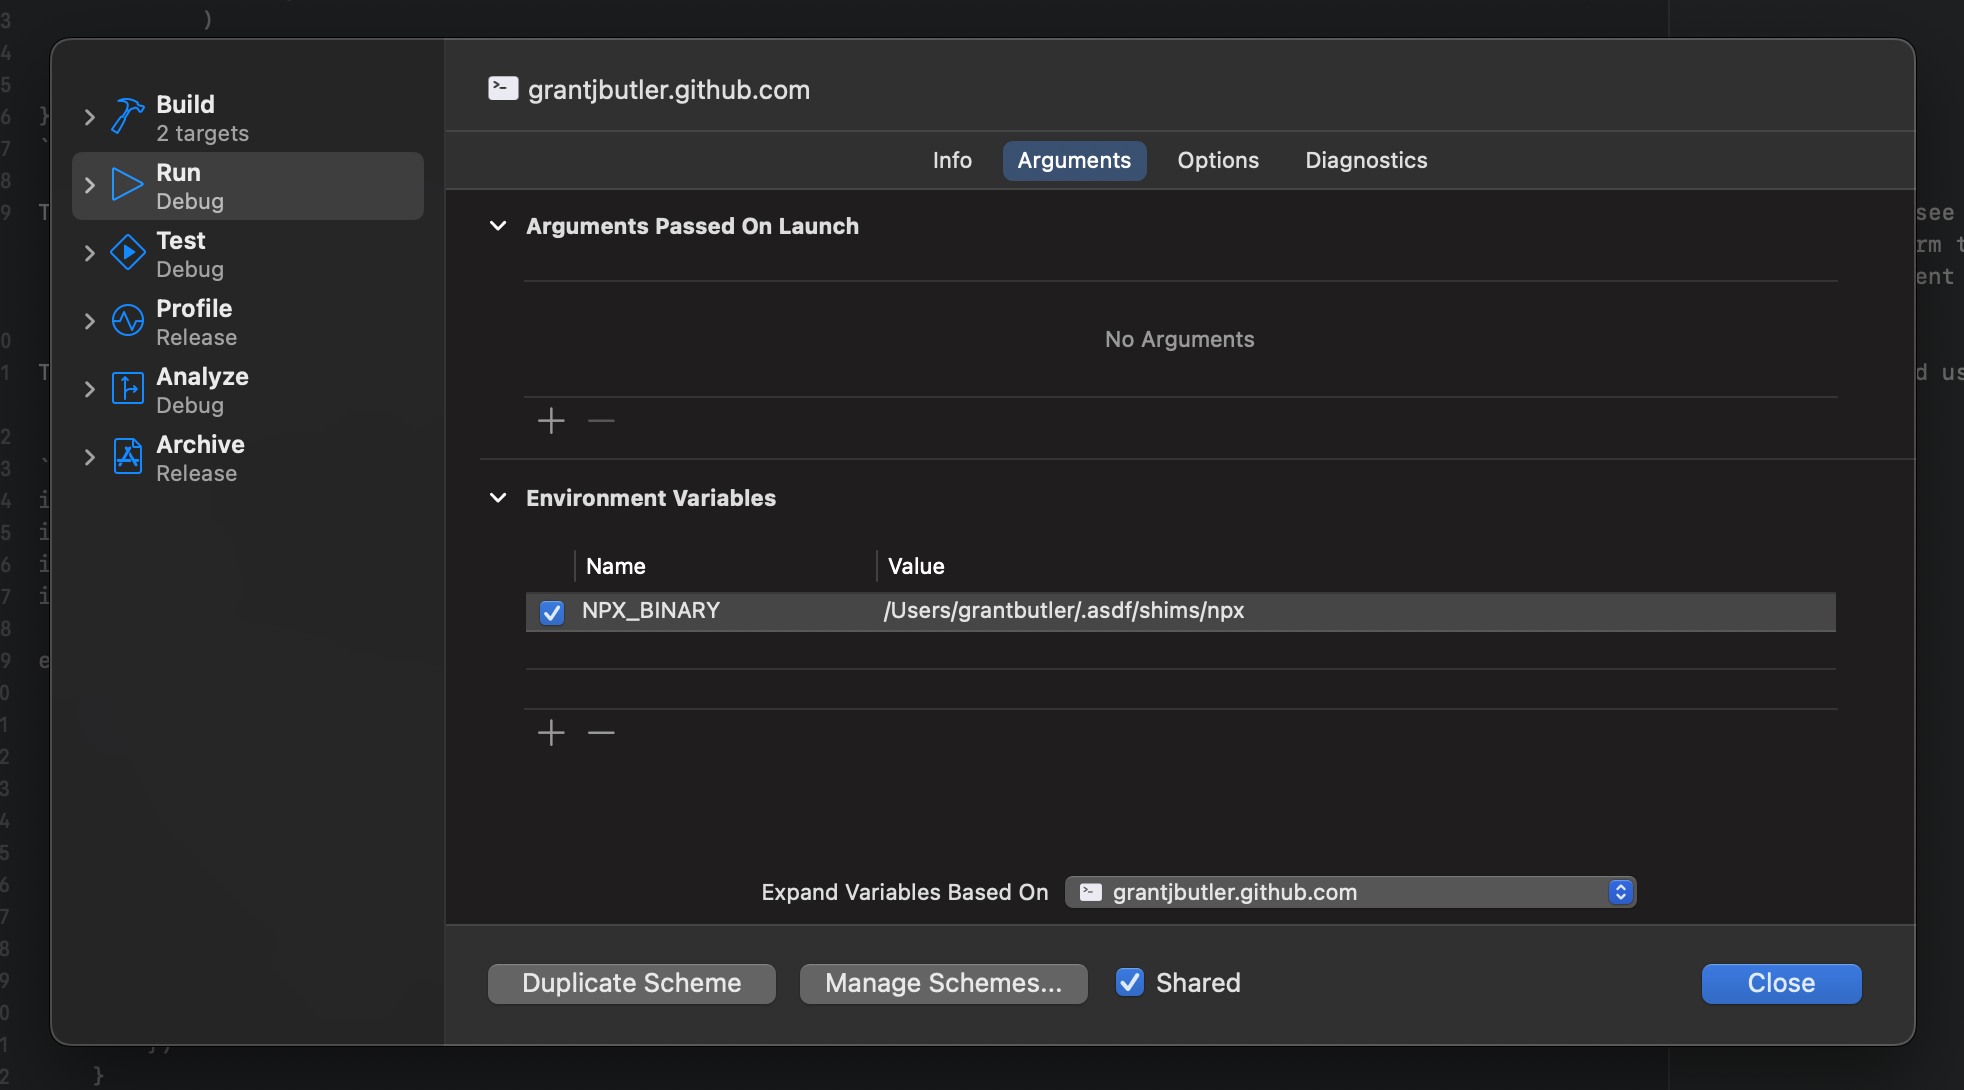
We can then set the NPX_BINARY environment variable to where npx lives from within the "Run" section of Xcode's Scheme Editor:

Xcode's Scheme Editor, highlighting the environment variables for the Publish project's scheme, which has an NPX_BINARY key-value pair.

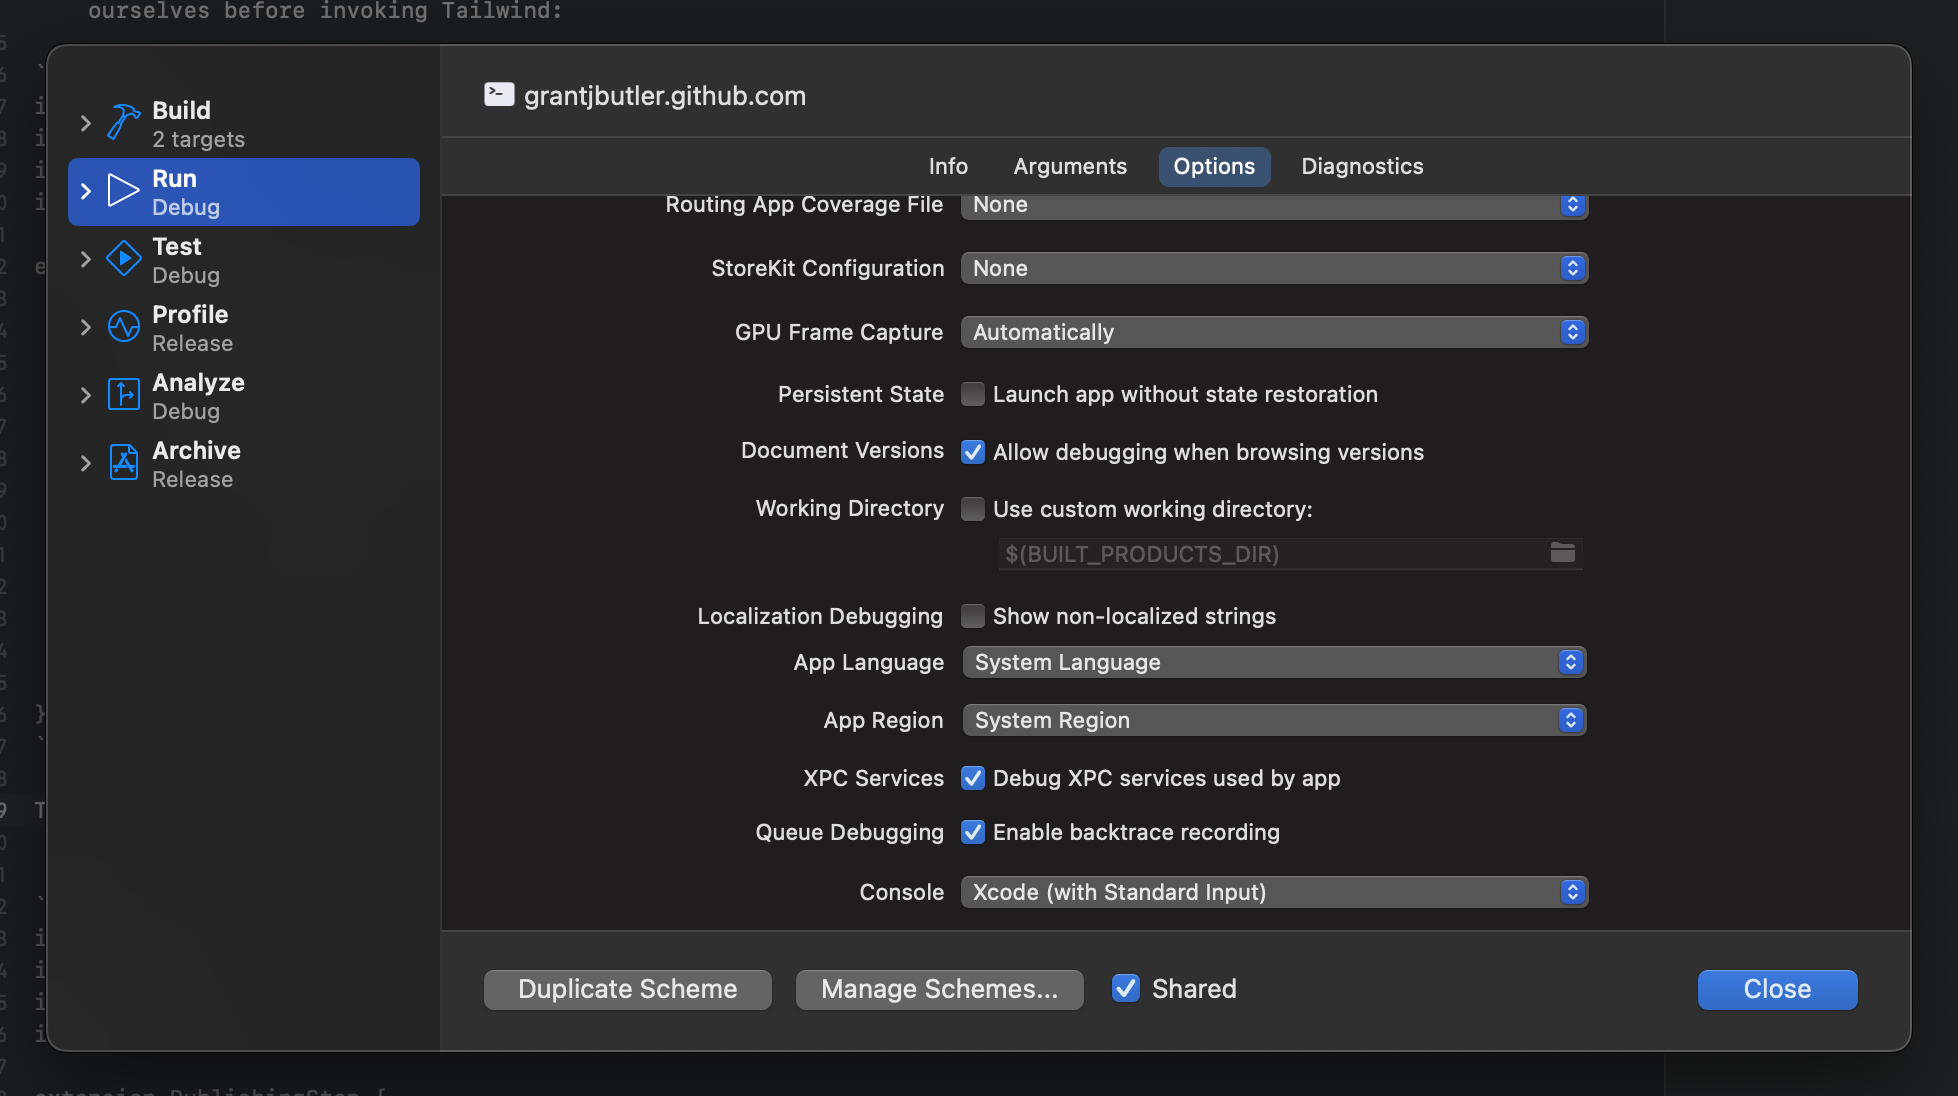
If we try to run our publishing step now, we may get one last error, again stemming from if we're running our build pipeline from within Xcode or not. By default, when Xcode runs a built command line tool, it'll set the working directory for that process to the built products directory, which will usually be some folder that lives in the depths of ~/Library/Developer/Xcode/. This folder contains a slew of build artifacts related to your project, including the executable that generates your site, but does not contain your source code, resources, or other content. When you try to run npx from this folder, it can't find an installation of Tailwind to generate the styles. There's a couple of ways we could resolve this problem.

First, we could fix this from within Xcode by opening the Scheme Editor again and specifying an explicit working directory in the "Options" tab:

Xcode Scheme Editor, showing the

Alternatively, we could fix this by being explicit about in which directory we run npx. By getting a path to the package's root directory and providing that to our shellOut call, we can set the working directory for the invocation of npx, so it can find the Tailwind installation:

import Files
import Foundation
import Publish
import ShellOut

extension PublishingStep {
    static func generateTailwindCSS(
        inputPath: Path = "Resources/styles.css",
        outputPath: Path = "styles.css"
    ) -> PublishingStep {
        .step(named: "Generate Tailwind CSS", body: { context in
            try shellOut(
                to: ProcessInfo.processInfo.environment["NPX_BINARY", default: "npx"],
                arguments: ["tailwindcss", "-i", context.file(at: inputPath).path, "-o", context.createOutputFile(at: outputPath).path, "--minify"],
                at: try context.folder(at: "/").path
            )
        })
    }
}

With this last change in place, we're in a state where this publishing step works! With this added to our build pipeline, Tailwind will generate someCSS and put it in Publish's Output folder for use in your website. While you can copy the code from this page and pull it into your site, I've gone ahead and bundled it up in its own Publish plugin. If you have a need to generate your site's syles with Tailwind, check it out and let me know how it works for you!

August 2023

So, Let's Try This "Blogging" Thing Again...

2 min
#blogging

Over the years, I've tried blogging a number of times, but it's never really stuck. While I may start strong, I would always eventaully fall off with posting things to the blog. Eventually, my personal site just turned into a landing page with links out to other places where I'm active or would post things.

But now I'm going to give it another shot. I've worked on a couple of different projects recently where I've thought to myself "you know, no one's really talked about building something like this. I should write about it." I've also got a number of projects planned where I could see there being some interesting topics to write about. But my current website doesn't really allow for writing things. So I rebuilt it.

The new site is built using John Sundell's Publish. It's a static site generator built with Swift that can (among other things) process Markdown files to build a website consiting of a bunch of HTML files. Pretty much par for the course if you're used to other static site generators like Jekyll or Hugo.

The nice thing about Publish being written in Swift is that I know Swift, which means I can easily extend it if I need to. I've already done a number of custom things to build this website and make the experience of developing the site a little bit nicer. Some of those things, I plan to write about here and even potentially open source for others to use.

So, that's that. Though I have several more things I want to do with this website, it's now in a state where I can start writing things, so here's a first post to kick it off. I've got a lot of topic ideas to write about, so I'm hoping to stick with this to be able to cover all of those topics. We'll see how well I can do.